
Sometimes I can’t believe how much of a change you can make to your images using Exposure. It’s always fun to artistically play with new options and discover what you can create. I love Exposure’s huge library of presets, and its layers functionality. Those two features enable me to easily make textured, painterly looks that take my images to a whole new level. In the article below, I’ll show you how I made a colorful, vintage look with a painting-like qualities with Exposure.
Capturing the Scene
On a photography road trip to Port Royal, South Carolina, my goal was to capture a great shot of shrimp boats. I ended up in a really great spot on a dock when the light was just right. I prefer to shoot with a tripod, but I ran out of time before the sun began to set. When I discovered HDR photography, I immediately fell in love, so most of my work is taken in bracketed exposures to increase the dynamic range in my photos.
Shooting bracketed photos handheld is not an ideal scenario. The frames won’t line up exactly right, which can cause ghosting artifacts in the merged image. It’s easy to spot ghosting in cloud formations, because they can easily morph and change from moment to moment between frames. For photographers who use exposure bracketing, it’s common to bracket between three to ten photos for a single image using a tripod.
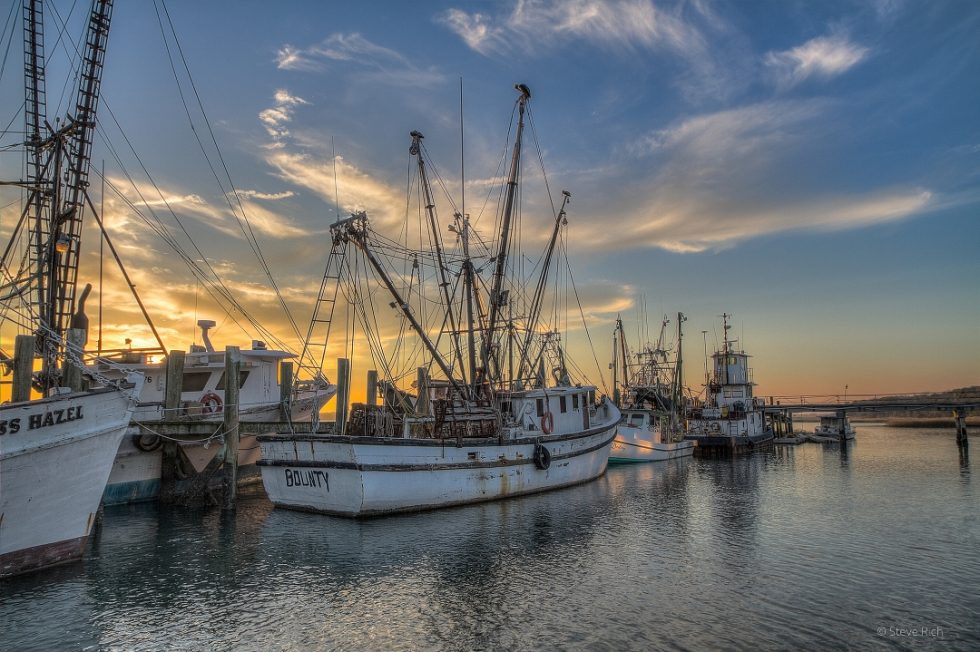
Original image, before processing. This photo was captured in three bracketed shots at -2, 0, and +2. I used my Canon 7D, and Tamron 10-24mm. The bracketed shots were merged into one single image using Photomatix Pro. No other processing.
Exposure Workflow For Painterly Looks
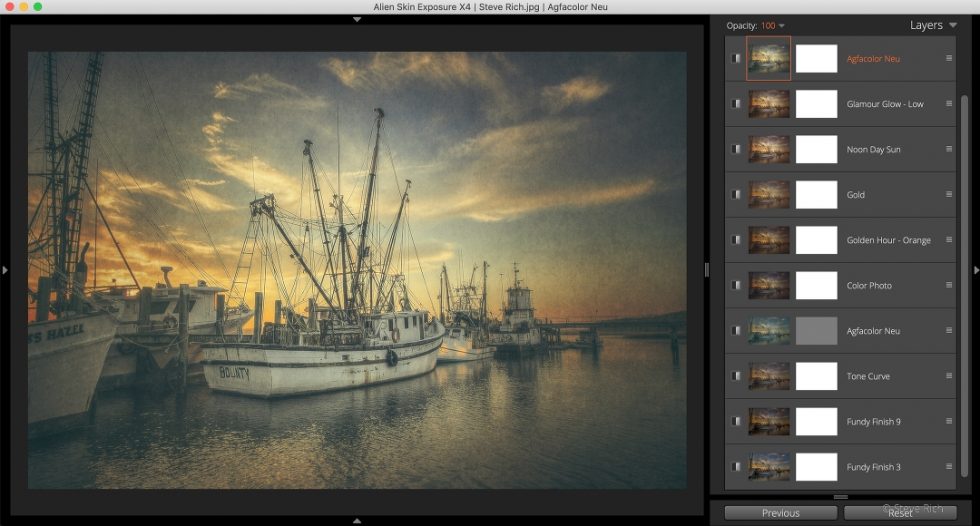
Opening the image in Exposure is when the magic really started happening. One thing I love about Exposure is its huge library of useful presets. There are many great options that I can quickly develop a unique creative effect by blending several of them. I can customize any of the presets for the photo I’m working with, or I can just use them as they are and adjust the layer opacity. It’s very flexible, so I hardly ever write down the steps I took to create a certain look. Remaking a look in Exposure is easy. And usually I discover a better way to build a look the second time through.
For this shrimp boat photo, I wanted to add some dense texture to give it painting-like depth. So my first steps in post-processing were made to build-up layers of texture. Both of the overlays I used were set to Multiply mode, which darkened the photo a little bit. I used Exposure’s protect location tool for both of the textures to keep them off of the boat in the center. I raised the black point on the Tone Curve panel, added contrast, and I brightened the midtones and highlights. At this point, the texture is easily noticeable near the edges of the photo, and it organically fades out toward the middle of the shot.
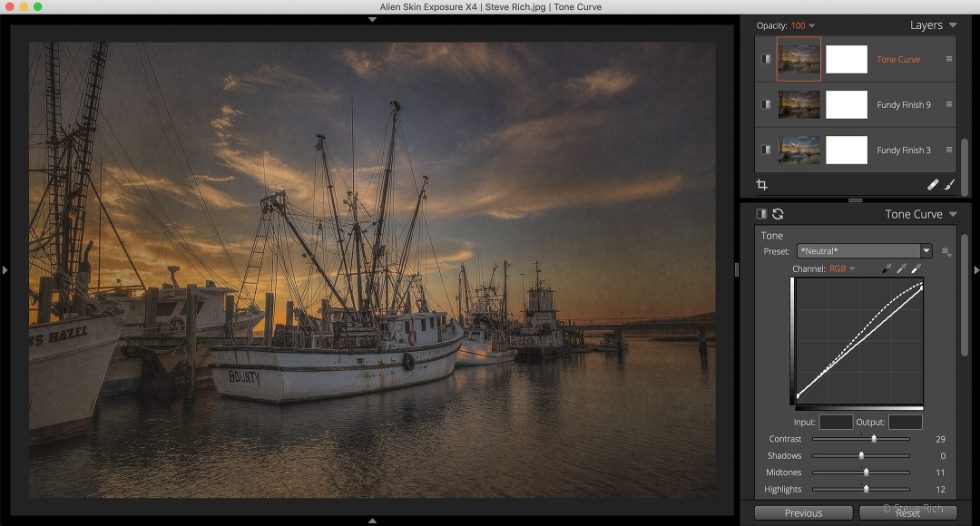
Raising the black point value on the Tone Curve can give images a vintage fade, or matte look where black values appear grey.
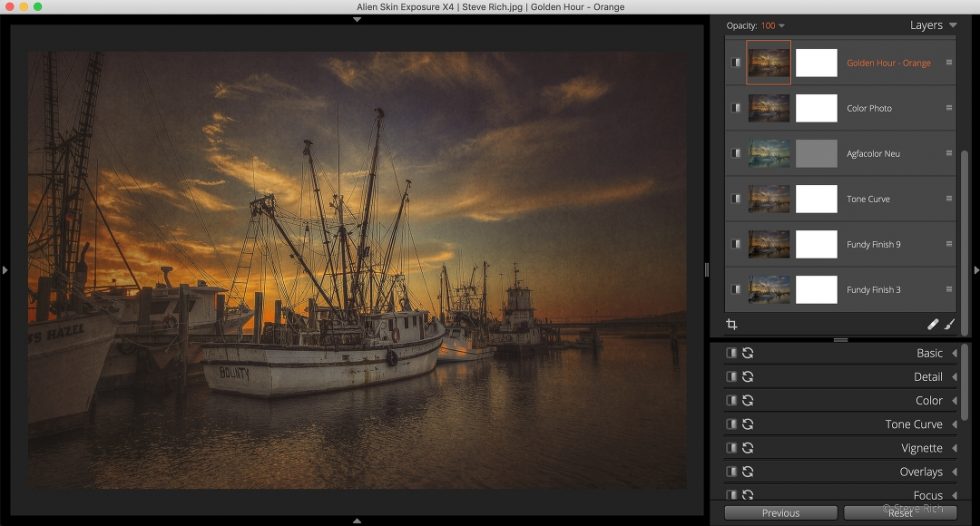
Next, I focused on the color tones in the photo. One of my favorite presets, and one I just can’t seem to go without, is Color Films Aged – Agfacolor Neu. I love the bright turquoise coloring and gentle grain it adds to my work. The tones that preset introduced are cool, so I also added a warming preset, Color Films Aged – Color Photo, to compliment the cooler tones with a warm, rich yellow-brown. This preset also introduces a subtle blurring effect, and a vignette, which gives the shot a vintage feel. Additionally, the Color Mist Effects – Golden Hour – Orange preset was added to warm up the deep shadows in the foreground. The shot has gorgeous color contrast and saturation in the sky at this stage.
Next, I wanted to brighten the image and focus the viewer’s attention on the boat in the middle. I added the Bright – Gold preset to brighten the image and add more warming in the sky. Next, I applied the Color Misc Effects – Noon Day Sun preset, which further brightened the image, reduced the saturation in a some tones, and added clarity. This gave the boat a lot of presence in the shot, but almost too much in areas. The rigging lines looked almost too sharp. I applied the Glamour Glow – Low preset to subtly smooth the texture in the photo, reduce the over-sharp edges, and blend the shot together. And then I added my favorite Agfacolor Neu preset, again.
Exposure’s flexible presets work great on their own, they are easily customizable, and they can be combined with other presets to achieve a unique effect.
At the end of my workflow is when I make adjustments to the controls on the Basic panel in Exposure. I let the presets do the bulk of the work, so at this point, I make small adjustments to darken the highlights, raise the whites, lower the contrast, etc. For this shot, I also added the Creamy Highlights/Cyan Shadows split toning preset and adjusted the coloring.
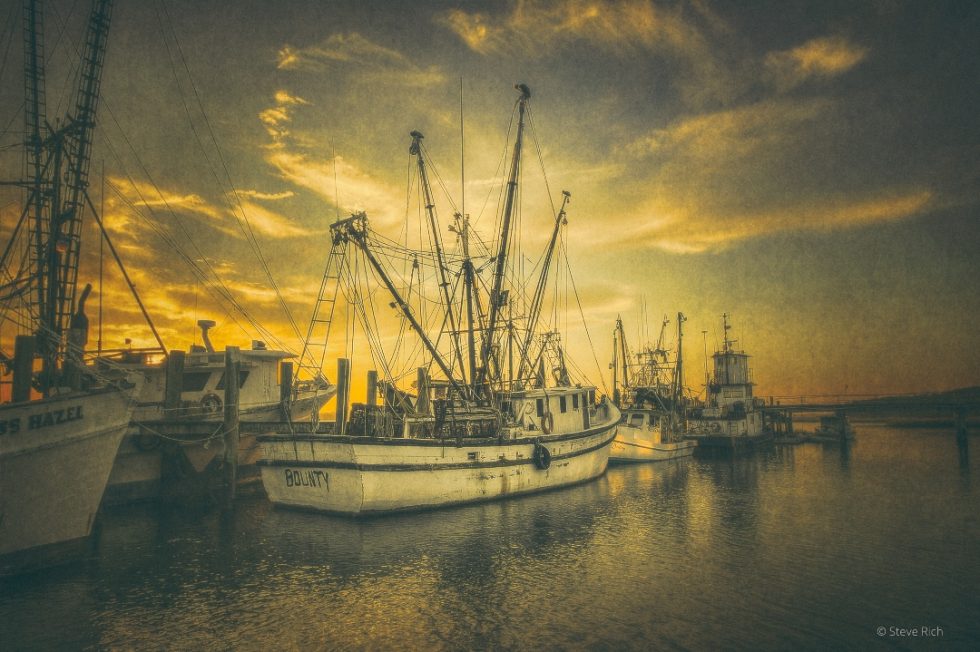
Finished Image
I just love what Exposure is doing to these shrimp boats. Exploring the creative options Exposure’s presets offer is always an enjoyable process for me. I used Lightroom for a long time, but I am using Exposure in lieu of Lightroom now. It’s totally refreshing to use Exposure. Its editing tools are easy to use, the presets are gorgeous, and it’s lightning fast. This is why Exposure plays such an important role in my editing workflow.
For those of you interested in the Exposure X4 preset I created for this shot. Simply click on this link to download the file. After it downloads, double-click on the file to unzip. And double-click on the preset file with the .f1s extension. That will install it into Exposure. It will not work with earlier versions of Exposure, only Exposure X4.
Try Exposure Today


Thank you Alien Skin Software for the share and blog entry!! Very much appreciated.
Excellent tutorial Steve. Thank you for sharing.
Thank you Ted, really appreciate your comment.
Great Job, I have used Snap Art and will follow-up with your technique. Great job
My pleasure Kenny, let me know if you have any questions. My image tend to hug the dark side. You can always lighten them up. Feel free to modify the presets.
it doesn’t look painted
If you are looking for a more paint-like appearance, rather than the gentle textures that appear in Steve’s shot, check out Snap Art. With Snap Art you can easily create paintings with detailed brushing, built up brush strokes, realistic canvas texture, and more.
Kudos to Alien Skin for allowing a hobbyist photographer to share his workflow, with whom I can identify as a hobbyist photographer, whereas other software companies use only “professionals” for their tutorials. Steve’s blog inspired me to use Exposure.
Thanks for commenting, Ralph. At Alien Skin, we love all our software users, not just the big name pros. There are a lot of talented photographers out there that just love to create awesome photos, and Exposure works for them just as well.
Thanks Ralph for your comment. I was honored to contribute. I love sharing my workflow and the feedback. I now find myself using less of Lightroom and more of Exposure.
Are the texture layers only available in AS4?
No, Exposure X2 introduced the layers capability, which makes this possible. Texture overlays have been part of Exposure for a long time.
HI Steve… great tutorial…
I downloaded your Preset (thank you) but now am trying to re-create the painterly effect on the same image by starting from scratch But… it appears you are using some other presets other than the original 500+ included with EX4? i.e. Fundy… I also am not familiar with Multiply mode or the protect location tool you reference. I’ve been through all of the videos (more than once for some of them) at AS but don’t recall those being mentioned.
With respect to anything that wasn’t included in your tutorial is there any thought to making a quick list of which ones aren’t, and then a link to where we might find them?
Hi Dan – The Fundy texture overlays have been part of Exposure for a while. Check out our Overlays video, which demonstrates how to use the overlays in Exposure, including the blending modes and the protect location tool.
Hi Dan, as Jimmy mentioned, the Fundy texture overlays are part of Exposure. I find myself drawn to them for all my textured images. One thing to check, do not worry about the protect location tool yet. Experiment with different BLEND modes, raise and lower the opacity. I will often raise the opacity to produce an extreme effect but lower the opacity on the layer to reduce the extreme as I blend more presets and adjustments. My base image of the shrimp boat was a combination of three merged images within Photomatix Pro. I did not make any adjustments to the final image knowing this image was headed to Exposure X4. My images are NOT jpegs. I usually editing in a Tiff format. Even the merged image out of Photomatix Pro is a tiff format. If you want, I’d be happy to edit one of your images using the presets and see the results I get.
Is there any way to import lightroom presets to alienskin?_
Unfortunately adjustment presets can not transfer between Lightroom and Exposure. It’s just not possible to move presets like that because the parameters are frequently different.
I downloaded the preset, double clicked on the .f1s extension, X4.5 stated it is installed, but I am unable to find it under presets, any ideas?
Thanks for your interest! Try searching with the preset search bar. This preset uses the term ‘shrimp’ in the name, which should narrow your preset results, considerably. If you’re getting the confirmation message that the preset has been installed, it should be in there. Here is a link to a helpful tutorial about working with presets in Exposure. https://www.alienskin.com/tutorial/working-with-presets/