
© Scott Stulberg
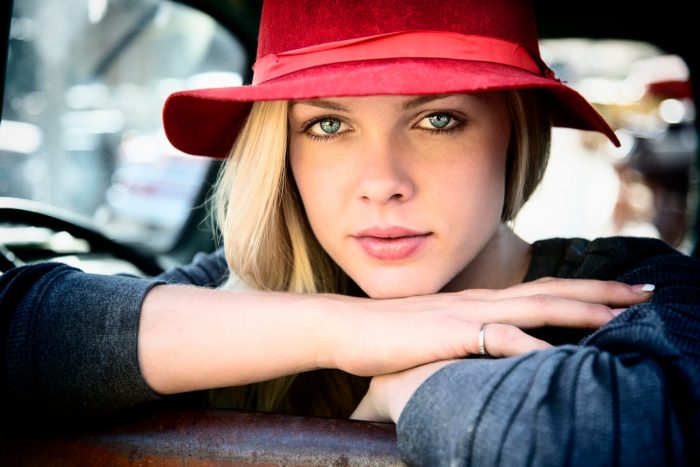
Stock and travel photographer Scott Stulberg took the wonderful portrait photo that is the showcase photo for Exposure X3. Here, he tells us how he got the shot, including how he uses Exposure for editing portrait photos.
Can you tell us how this shot came about?
The story behind this shot is pretty easy. I am one of Photoflex’s Light Leaders and they make fantastic lighting equipment. They sent me a very cool new system called the LiteReach that lets me hold a large diffuser way up on the air at the end of a very strong pole. It worked great for the shoot as I placed Tiffany in an old beat up truck in an auto graveyard. The diffusion way up in the air helped soften her entire face and also what she was wearing and took away the harsh contrast that was everywhere that day. You definitely need an assistant to hold the system but it’s a great way to soften the light. I use diffusers all the time but when the sun is higher having this system way up in the air is definitely a bonus!
I knew with her blue eyes that a nice red hat would really help the overall look. I put her in the front seat of the truck and had her lay on her arms looking straight at me and asked her to look almost through me so that I could really capture who she was. No smile, just a powerful look.
How did you prepare for the shot that day?
I prepared by testing out the LiteReach gear while she was sitting in my car before we got to the junkyard. I wanted to see how this new system worked and also if we had the right clothing. Everything just clicked but we also tried other things and different hats. We finally felt like we were ready to go and try something different in this incredible junkyard not far from where I live. I love shooting in auto graveyards and have done many workshops with models in these places and they are just off-the-wall amazing for photography.
Are there any guiding principles that you follow when shooting portrait images? If so, can we see evidence of them in this shot?
I’m not sure if I think about any set rules when it comes to shooting portraits. I know I want to see if one side or the other is more flattering, but in this case straight on looked fantastic with Tiffany. Sometimes I know that a hat will make a big difference as sometimes people, especially women, photograph much better with a hat. There is something that is so engaging in a beautiful hat that gives stopping power so often, meaning that people viewing the shot want to stick around for a little bit longer to digest what’s really making that image so powerful.
Posing is another challenge as many people, even models, find it hard to get comfortable. I knew in this particular image that not having her standing but having her lean on her arms would be about as comfortable as it gets and make her look as relaxed as possible. Getting people to look completely relaxed sometimes makes all the difference in the world. They don’t have to concentrate on their body position or worry about how their body looks, or if this or that is just not working.
Often times I will shoot subjects while they’re laying on their back and I’m straight above them, sometimes shooting just in on the face. They are incredibly relaxed when they’re laying flat on their back, very similar to Tiffany leaning on her arms.
What was your approach to post-processing with this shot? Did you have a particular look in mind as you began editing this portrait photo?
I didn’t really have any preconceived notions of what I wanted but I knew I wanted a little bit edgier. I wanted to pop the hat and her eyes but make her skin tones to look a little bit creamy and soft.
Having used Exposure since pretty much the day it came out long ago, I know that I can achieve certain looks with their software. I wanted a certain film look. I also love playing around with the sliders to create my own look that I can save and use on other images.
What adjustments did you make in Exposure, and why?
I did a lot of tweaking with this image, and it was really Exposure that got me started. I love using the black and white vintage films and one of my favorites is Wet Plate, which is just incredibly gorgeous.
So I played with that and took away the border and tweaked it until it made a really nice soft sepia black and white. I then saved that as a preset.
One of the best things you can do after playing around with Exposure’s presets is to completely tweak it exactly how you want, with every setting that makes it look just what’s in your mind’s eye, and then save that as your own user preset. I always give it the name of the subject or shoot that I was doing. So this one was called “Tiffany at auto graveyard.”
After that, I brought the black and white image into Photoshop, where I used the luminosity blend mode to convert the image to color. For many years, I have used this method of converting images to black and white or sepia first, and then using blend modes to change them to color. The end result can give you a very powerful color image that you can almost achieve no other way.
Sometimes it almost looks like there is a glow that you can achieve that really makes the image pop in certain ways. I knew that much of the image, especially her hat, eyes, and lips would take on a whole entirely different feel.
But what’s also nice with doing something like this as it completely changes the skin tones. Sometimes, you can achieve an almost ethereal but soft change in the skin tones.
I also applied some vignetting to the black-and-white image in Exposure, and that translated nicely to the color when I used the blend mode.
What tools in Exposure do you find most helpful for editing portrait photos?
That is a tough question as there are so many cool tools for working on portraits. I’ve always loved adding realistic grain to make the images look more film like. I’ve told my students for many years that the grain that is added in Exposure is incredibly realistic, as real grain is random, and noise from digital cameras is not. Alien Skin figured out how to create realistic film grain, so that has been one of my favorite things in Exposure. If used the right way, film grain can give your images a whole new look, especially in black and white.
One of my favorite films to shoot with was Kodak Tri-X, and you can definitely achieve the look of this film using Exposure.
But there are so many other things I love including creating vignettes by dragging your mouse around to get the look and feel you want. I love the different borders, textures, and light leaks.
The ability to work with layers added a whole new dimension to Exposure.
I also love working with the Bokeh panel as you can really create beautiful blurring that mimics different kinds of lenses. There are different modes to the panel, which I absolutely love. It’s something that you can get addicted to very easily.
Exposure’s Basic panel is filled with just about everything that you need to get exactly what you want.
Now that Exposure works as an incredibly powerful standalone, many times you don’t really need anything else but this one program. Pretty powerful stuff that can help so many images.
What post-processing advice would you give portrait photographers who are looking to improve the quality of their edited images? How does Exposure help them with editing portrait photos?
You do have to start out with a good image overall, a good shot that will be well exposed and where your subjects look pretty good.
It’s then that you have the ability to envision a little bit of where you want that image to go.
There are plenty of presets you can easily choose in Exposure but what really makes the program work is by working on the right side of the program, where all of the the panels and sliders are. These let you tweak here and adjust there, to really get to where you want to be.
You have to understand some of these panels pretty well and know how powerful they can be, what kind of changes they can make to your image. Alien Skin has some great tutorials and before-and-after images also, and those can show you the potential of what you can do with some of your own photographs.
I think you really have to explore many of the film types in the left panels – go through them and really see what you like on your particular images. Just because one preset looks good with one image doesn’t mean it’s going to look good with the next image.
Starting out on the left side of Exposure and understanding all of the film types, from color to black and white, and what might really be a good starting point for some of your images, well, to me that is key.
Then taking those presets and adjusting them to be exactly what you are looking for, and then saving those as your own user preset, that is really the direction that most will want to go for.
And remember – it’s all fun! It’s great that we have excellent software that just keeps getting better and better, year after year!! Go out and have some fun!!
Try Exposure Today


Fantastic shot accompanied by a great read on how it was produced.
Thank you very much, Aiden. I’m glad you enjoyed it. Scott is a fantastic photographer and a joy to work with.