
The curves editor is a powerhouse for editing brightness and color tones. Some photographers will only use curves to make adjustments in post. This goes to show how flexible they can be. Regardless of the program, this tool can be intimidating to use. This is especially true if you don’t have a good grasp on how it works. This article isn’t an exhaustive depiction of what is possible with this tool–it’s a quick guide to help you become familiar with it.
Make it easy:
Here is something I wish that I had when I first started learning about curves–Exposure. Exposure’s curve controls are found on the Tone Curve panel. With the exception of the sliders, this tool behaves similarly to the curves editor in Photoshop. The sliders simplify the adjustment workflow. Changes to the sliders will display in the curve editor as a dotted line. This is a great way to visualize curve behavior. I recommend starting here.
In my recent Film Noir video tutorial. I used the controls in the Tone Curve panel to make the image more dark and mysterious, bring back some lost details, and make the photo appear to be lit by an old film projector. Adjustments like these are a simple process that produce great-looking results. Check it out.
How Curves work:
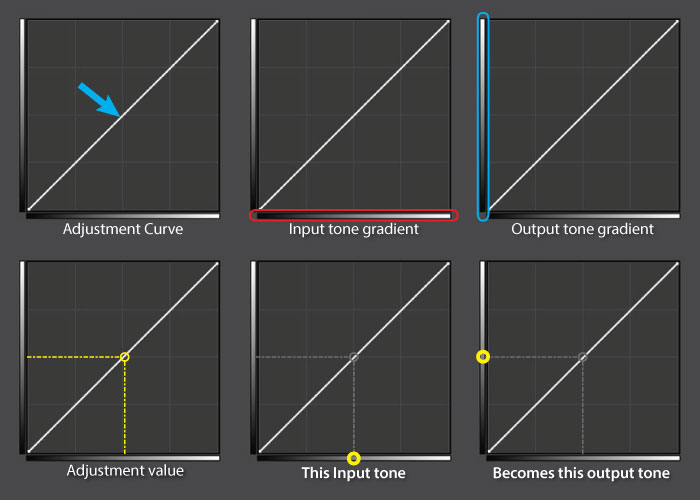
The curves editor essentially illustrates the relationship between the input and output tones of an image. Input being the unaltered image’s tone, output is the new value you assign to it. The tonal values are represented by the gradient strip at the bottom and side. The curves themselves provide a way for you to selectively manipulate these tonal values. An alteration made to a given input tone such as the midtones, will correlate to a change in the image’s brightness. Below is a curve example for darkening.
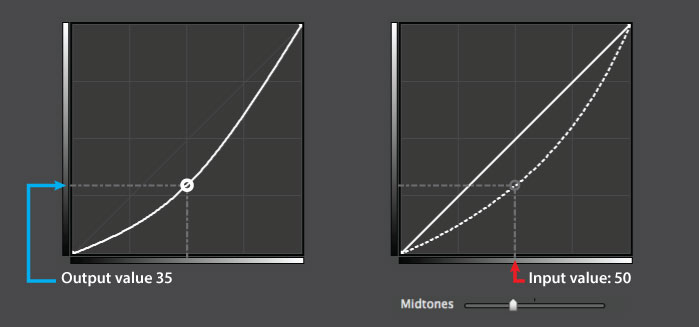
Pictured here are two identical curves. These both bring the input value of 50, the midtone, down to a darker value of 35.
Exposure’s midtones slider was used in the curve on the right. See the dotted line?
What Curves do:
Remember, curves have two primary functions: tone and contrast. ‘Tone’ refers to luminance values in the image, such as the highlights or shadows. ‘Contrast’ is the rate of change between the tones.
Low contrast, in curve terms, means there is a gentle change between the tonal values in the center, or midpoint, of the curve. “Lowering the contrast” suggests the same behavior, but is usually in reference to a slice of the tonality pie. For instance, below is an example of a low contrast curve.
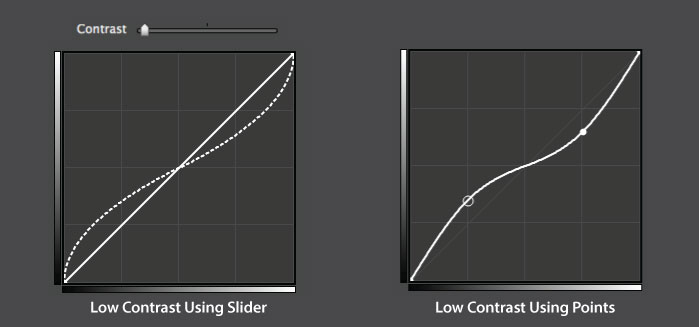
These curves show a gentle change from left to right which lowers contrast in the midtones.
The Contrast slider was used in the curve on the left. The traditional point method was used on the right.
High contrast, in terms of curves, means the change between tones is more abrupt. Below is an example of a high contrast curve and one with increased contrast in the darker midtones and shadows–’crushing the blacks.’
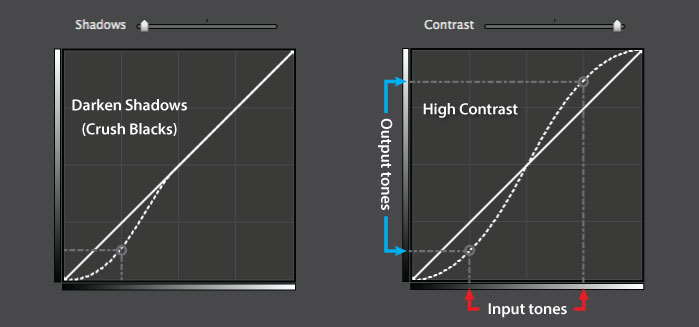
Notice the steep angle when tracing the curve from black, on the left, to white, on the right. Steep inclines mean increased contrast.
Advanced Uses:
We’ve been speaking about the curves in relationship to tonality, but I haven’t gone into detail about using curves on smaller pieces of your image. This was to avoid even more technical complexity. Curve behavior remains the same however they’re used. For additional control, you can use them on specific components such as the blue, magenta, or the lightness channel.
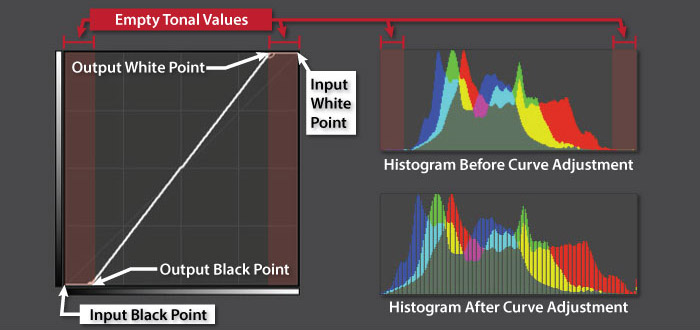
When curve adjustments are used along with the Histogram, they can be used to regain some lost tonal range in your shot. Below is an example of modifying the black and white points. Adjustments like this stretch the histogram to it’s edges, widening the image’s tonal range. The histogram is a graphical representation of all tonal values in an image.
Conclusion:
Curves are a powerful way to make adjustments, but they can be daunting to use. With a little practice, the mastery of this tool is within your grasp. I recommend that you test them out the easy way. If you don’t already own Exposure, download the free trial to start fiddling with sliders to see what the curves can do for you.
Try Exposure Today


